Tag Archives: granny squares

April – Square Seven

April – Square Seven

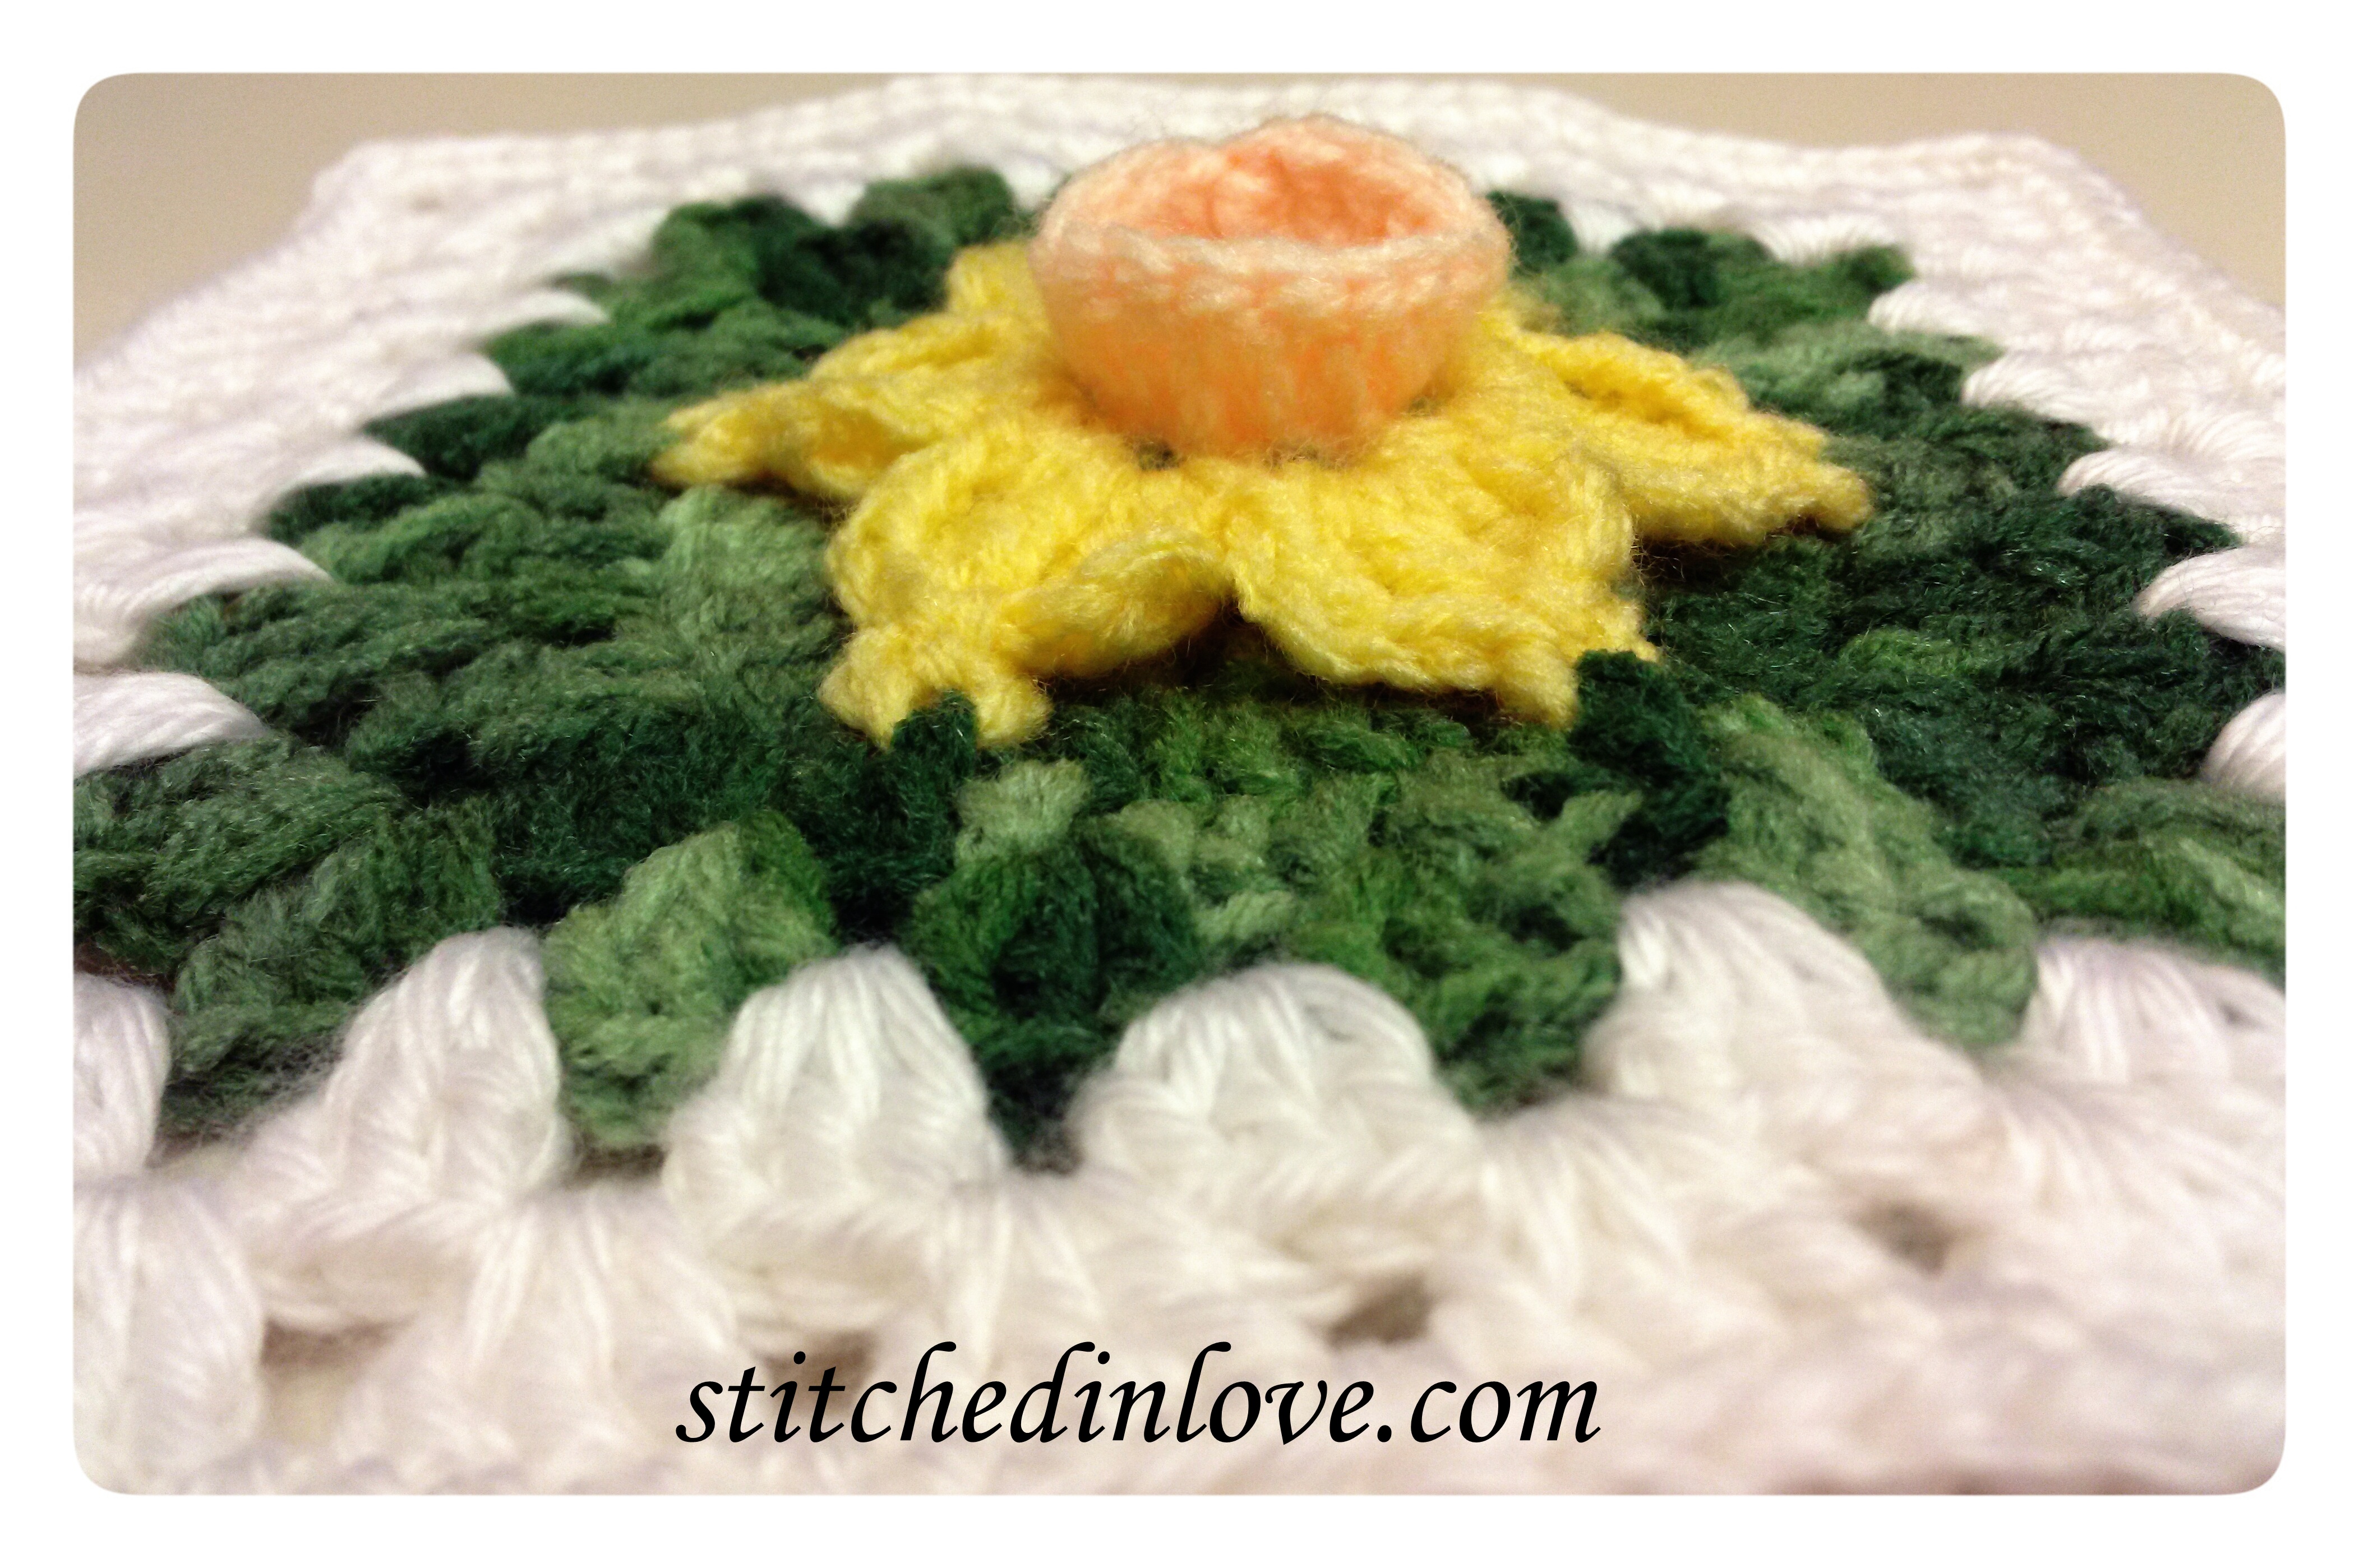
April’s first square is a daffodil.  To give credit, I got the pattern here on Craftsy, for $3.99 but the pattern actually irritated me quite a bit.

It was very poorly written.  Many of the instructions were incomplete and unprofessional.  For example, when changing colors the instructions failed to indicate to finish off.  This even included the end of the pattern.  This may seem obvious, but most crochet instructions indicate that you should not finish off unless instructed to do so.

Some of the spacing  in attaching the daffodil petals to the green were just wrong in my opinion.  Also, the language used for many crochet instructions was not what is normally used in pattern instructions.  “Sc into ring” is used instead of “sc in ring.”  Into is just not necessary.  “Arches” is used instead of ch-2 space.

I did not like how the block went from circle to square by working 3 dcs in between stitches instead of having made a ch 1 space in the previous row for that purpose as is usual with granny squares.

captured_by_snapseed_28_1The pattern is marked as easy but I strongly disagree with that.  I was able to figure it out and get it to work, however I don’t think that a beginner would have been able to pick it up and get a good result without help.  For example, a picot stitch is used for the tip of the flower petals, however the pattern does not give specific stitch instructions for a picot.  There are two issues with this.  One: A picot is not a beginner stitch, it is a more advanced stitch.  Two:  There can be different ways of doing a picot so stitches like this should never be assumed.  Additionally, 3-d work and shaping are generally not considered beginner level.  I would really consider this more intermediate to advanced.

Finally, the thing that irritated me the most is the trumpet of the daffodil.  The instructions say to work a round of single crochet in the front loop only of round 1.  This would be great except that round 2 was NOT worked only in the back loop of round 1 so it was extremely difficult to work into the front loop of round 1.

All that being said, the square turned out very charming with another 3-d aspect.  But I think I’ll take time tomorrow to rewrite the pattern and make these corrections mentioned and see if it turns out any better.

3 Comments

Filed under 30 Days of Blog - 2014, The Granny Square Project

March – Square Six

March – Square Six

March – Square Six

I’m finally back on the Granny Squares.  This shamrock square turned out really cute.  It’s hard to see in this picture, however the square is crocheted behind the shamrock giving it a 3D quality.

The shamrock is worked first and I used the same shamrock as my St. Patrick’s Day Garland. The rest is worked the same as  January’s Square One again, starting with round 2 joined to the back of the shamrock.  It is really easier than it might seem.

This square, as with all of them really, will look much better after I get it blocked.

Leave a comment

Filed under 30 Days of Blog - 2014, The Granny Square Project

30 Days of Blog

10257575_10203950491468669_9028171033787255028_oSo a friend of mine does a daily blog challenge in June every year and invited me to join this time around.  Which really is good because I am ser-i-ous-ly behind in the Granny Square Project.  I probably won’t get a post in EVERY day, but I’ll try.

So to start off with, here is what I am working on.  I had planned to make this baby doll and basket to give to Sephy when Greyson was born.  It is a kit from Mary Maxim Babyand if interested you can find it on their website by clicking on the picture.  I was going to start it right after Christmas last year so that I would have it done in time to give her at the hospital when she came to meet him.  He was due January 18th so I had plenty of time, right?  Yeah, not so much.  Since he decided to join us in time for Christmas Eve I didn’t even get this thing started.  And of course life with a newborn doesn’t leave much time for crocheting (hence being behind with the Granny Square Project too.)  But I finally started it the other night.  I’ve got the blanket and the pillow done and hope to finish the rest of it up this week.  I’ll post progress pictures starting tomorrow.

In addition to this, I have to get caught up on March’s second Granny Square as well as both squares from each of April and May.  I should have plenty to keep me in the blog posts so hopefully I’ll actually start getting some stuff done.  I also have some plans that I have been working on with my Sister over at Vintage Wedding Gems in the pipeline, but we’ll get to that a bit later.

Leave a comment

Filed under 30 Days of Blog - 2014, Baby, The Granny Square Project

February – Square Four

February - Square Four

February – Square Four

February’s second square is quite a bit more complicated and includes an Extended Double Crochet Cluster (EDCC) which I had never done before.  The heart is crocheted first and then the granny clusters must be worked around it and built up to make the piece square.  The heart ends up slightly off center in order to accomplish this.  The pattern for this square can be found here.  I made a few small modifications for mine including changing color back to red at the half double crochet round and then changing back to white again and crocheting another double crochet row followed by a single crochet edging.  Happy Valentines Day!

Leave a comment

Filed under The Granny Square Project

February – Square Three

February - Square Three

February – Square Three

February’s first square is another very basic Granny.  As a matter of fact, the first three rounds are worked exactly the same as the basic Granny I did for January’s first square.  However, starting with round four, instead of working clusters (3 dcs) in chains spaces, double crochets are worked in the previous row’s double crochets – with the exception of the corners of course.  I completed this square in a single variegated yarn instead of finishing off and changing colors after each round.  I prefer January’s basic Granny over this one.

Round 1: Sl st in a magic ring, ch 3, 2 dc in ring, ch 2, (3 dc, ch 2 in ring) 3 times, join with sl st in top ch of beg ch 3, pull tail of magic ring tight to close ring to complete round.

Round 2: Sl st across to corner ch 2 sp, ch 3, 2 dc in same sp, ch 1, (3 dc, ch 2, 3 dc in next ch 2 sp, ch 1) 3 times, join with sl st in top of beg ch 3.

Round 3: Sl st across to corner ch 2 sp, ch 3 2 dc in same sp, ch 2, 3 dc in same sp, ch 1, (3 dc in next ch 1 sp, ch 1) across to corner, *(3 dc, ch 2, 3 dc) in corner ch 2 sp, ch 1, (3 dc in next ch 1 sp, ch 1) across to corner, repeat from * around and join with sl st in top of beg ch 3.

Round 4: Sl st across to corner ch 2 sp, ch 3 2 dc in same sp, ch 2, 3 dc in same sp, ch 1, 2 dc in next ch 1 sp, dc in next dc and in each across to next ch 1 sp, 2 dc in next ch 1 sp, ch 1, *(3 dc, ch 2, 3 dc) in corner ch 2 sp, ch 1, 2 dc in next ch 1 sp, dc in next dc and in each across to next ch 1 sp, 2 dc in next ch 1 sp, ch 1, repeat from * around, join with sl st in top of beg ch 3.

Repeat round 4 until desired size has been reached. Finish off.

Leave a comment

Filed under Patterns, The Granny Square Project

January – Square Two

January - Square Two

January – Square Two

January’s second square is a bit more complicated.  I continued with the cold winter blue and white and added a snowflake.  This pattern requires a bit of knowledge in shaping in order to transform the piece from round as it starts out, to square by the last round.

The FREE pattern for this square can be found here on Ravelry.  The original picture there is in red and white and the center is done in the contrasting color rather than making the inside all the same color.  But it looked like a snowflake to me so I did the center all in white.  Just another example of the different results you can get by changing colors.  I also skipped the last round of single crochets on this one as I had already reached my seven inches by the round of double crochets.

I do like how this one turned out.  The snowflake is very pretty.  I didn’t find the pattern to be completely clear though.  I had to do a bit of experimenting to figure out the shaping.  But it all turned out well in the end.

Leave a comment

Filed under The Granny Square Project

January – Square One

So I am a little behind in starting out the Granny Square Project.  The new baby decided to come a few weeks early in December rather than wait till the middle of January so I’ve been a bit busy.  But, we went to visit the in-laws this past weekend and I was able to get caught up while they played with the kids.  So I will be posting both January and February’s squares here shortly. 

January - Square One

January – Square One

January’s first Granny Square is the most basic of Grannies.  I completed it in blue and white to go with all the cold temperatures and snow we’ve been having this winter.  Each of the squares in the project will be seven inches square.

The basic pattern is as follows.  As a note for all my Grannies, I start them all out using the “magic ring.”  There is a good tutorial here if you need it.

Round 1: Sl st in a magic ring, ch 3, 2 dc in ring, ch 2, (3 dc, ch 2 in ring) 3 times, join with sl st in top ch of beg ch 3, pull tail of magic ring tight to close ring to complete round. Finish off.

Round 2: Join new color with sl st in any ch 2 sp, ch 3, 2 dc in same sp, ch 1, (3 dc, ch 2, 3 dc in next ch 2 sp, ch 1) 3 times, join with sl st in top of beg ch 3. Finish off.

Round 3: Join new color with sl st in any corner ch 2 sp, ch 3, 2 dc in same sp, ch 2, 3 dc in same sp, ch 1, (3 dc in next ch 1 sp, ch 1) across to corner, *(3 dc, ch 2, 3 dc) in corner ch 2 sp, ch 1, (3 dc in next ch 1 sp, ch 1) across to corner, repeat from * around and join with sl st in top of beg ch 3. Finish off.

Repeat round 3 until the desired size is reached. I also added a row of single crochet for edging with 3 sc being completed in each corner.  This is completely optional.

The nice thing about this is you can finish off on each round and add a new color, or you can continue in the same color.  Each square can look completely different, yet be completed from the same pattern.  You can also make it as large or as small as small as you like.  Usually the fewest rows completed is 3.  (See, I’m trying to appreciate the Granny here.)  January’s square two coming up shortly!

1 Comment

Filed under Patterns, The Granny Square Project

The Granny Square Project

This was my first Granny Square project.

This was my first Granny Square project. (Stock photo from pattern book.)

Like many crocheters, one of my very first projects was made up of Granny Squares.  The basic Granny Square is very simple and you can connect and combine them in a variety of ways to make endless different projects.  There are also countless variations on the basic Granny Square allowing crocheters an infinite variety of options in creating works of art.

But I have a confession to make… I always hated making Granny Squares.  By the time I finished the above project I was so bored with it!  When I crochet, I generally like to sit back and relax and crochet continuously, row after row.  But with a Granny Square you are usually creating one round and finishing off to change colors for the next round.  I disliked not being able to just sit back and relax and simply crochet.

In an effort to increase my appreciation for the Granny Square, I have decided to do a year-long project focused on these little gems.  So here’s the plan:  I will make 2 Granny Squares a month, for 12 months in 2014.  Each square will be a different variation on the Granny Square. At the end of the year I will join them all together into a 4×6 square afghan.  Each square should only take me an evening or two to make so I won’t have to spend all my time on the project, but will still get to create a variety of squares.  Probably the biggest challenge will be to modify my gauge and get all the squares to be the same size.

I’m starting my research for different squares to use on Pinterest so feel free to follow my board.  Also, feel free to send in your own Granny Square variation pattern suggestions either by email or on Facebook.  I’ll take pictures and post each month’s squares as we go too!

Leave a comment

Filed under The Granny Square Project

Hooded Baby Blanket

So I made this afghan a few weeks ago.  I had been holding off on crocheting anything for the baby for a couple different reasons.  First, I felt so crappy during my first trimester that I didn’t even feel like crocheting anything for two full months after I found out I was pregnant.  And second, I wanted to wait until we found out if we were having a boy or a girl so that I could crochet in appropriate colors.  But fortunately I started feeling better at just under 3 months, and at about a week before my sonogram at 19 weeks I couldn’t stand it anymore and had to crochet something.

A fellow blogger had posted this baby blanket (pictured at right) she had designed on The Blue Brick and a few of us who commented on the post were able to convince her to write out the pattern.  She did so, and graciously shared the pattern!  Click on the picture with the yellow hood to see the pattern.

Since we didn’t yet know the sex of the baby I didn’t want to crochet my traditional Ripple Baby Afghan yet.  So I opted for this great little piece in neutral colors.  It’s very simply done in rounds of double crochets with shell increases at the corners of each round, and was very enjoyable to work on on my bus ride into work a few days that week.  Once I got up to the last round and the hood I decided put the piece down for a few days until after the sonogram and then do it in either peach or blue.  As you can see I did peach.  Yes, we are having a little girl!  I did struggle with the pattern on the hood a little bit and I could not get it to come out quite like the original picture, but it’s a really cute piece and lovely for the first afghan that I have crocheted for my daughter!

This did get me thinking though.  I’ll still do my traditional  Ripple Baby Afghan, but I should probably also design my own baby afghan in honor of my baby girl.  I think I’ll do something in white that we can use for her Baby Blessing – perhaps with some pink ribbon embellishments.  But I can’t decide if I want to do something square or another version of a ripple afghan.  We’ll have to see about that.

Leave a comment

Filed under Afghans, Baby

Granny “Circle” Seat Cover Pattern

I wrote this pattern as a follow-up to this Idea post.  I was right in that both the pattern and the project itself worked up very quickly.  I made this holding 2 strands of yarn so it would be extra cushiony.  I also added four ties so that it could be secured to your 4-leg stool or chair. These are worked as part of the last round – not attached separately, making them even more secure.

Materials:

  • At least 2 colors worsted weight yarn – 2 skeins each
  • Size K Crochet Hook

Gauge: Not critical.

Pattern Notes:

  • This pattern is worked in rounds holding 2 strands of yarn together.
  • This piece must be blocked upon completion in order for your seat covers to lay flat.

Pattern Stitches:

  • Beginning Cluster (Beg Cl) – Ch 2, [Yo, insert hook in st or sp indicated and pull up a lp, yo and draw through 2 lps on hook] twice, yo and draw through all 3  lps on hook.  Beg Cl made.
  • Cluster – [Yo, insert hook in st or sp indicated and pull up a lp, yo and draw through 2 lps on hook] 3 times, yo and draw through all 4 lps on hook. Cluster made.
  • Ties: (Uses the next two stitches.) *Ch 20, sl st in second chain  from hook and in each back to last sc, sc in next sc, repeat from * once more for second tie.

Round 1: Ch 4, join with sl st in first ch to form a ring.  In ring: Work [Beg Cl, ch 2,] work [Cluster, ch 2] 4 times, join with sl st in Beg Cl, finish off. (5 clusters and ch 2 sps.)

Round 2: Join next color with sl st in any ch 2 sp, work [Beg Cl, ch 2] in same sp, work Cluster in same sp, ch 2, work [cluster, ch 2, cluster, ch 2] in next ch 2 sp and in each around, join with sl st in Beg Cl, finish off. (10 clusters and ch 2 sps.)

Round 3: Repeat Round 2. (20 clusters and ch 2 sps.)

Round 4: Join next color with sl st in ch 2 between 2 clusters in same sp, work [Beg Cl, ch 2, cluster, ch 2] in same sp, work cluster ch 2 in next sp, * work [cluster, ch 2, cluster, ch 2] in next ch 2 sp, work cluster, ch 2 in next ch 2 sp, repeat from * around, join with sl st in Beg Cl, finish off. (30 clusters and ch 2 sps.)

Round 5: Join next color in any ch 2 sp, work [Beg Cl, ch 2] in same sp, work cluster, ch 2 in next ch 2 sp and in each sp around, join with sl st in Beg Cl, finish off. (30 clusters and ch 2 sps.)

Round 6: Join next color in any ch 2 sp, work [Beg cl, ch 2] in same sp, *work [cluster, ch 2, cluster, ch 2] in next ch 2 sp, work cluster in next ch 2 sp, repeat from * around, join with sl st in Beg Cl, finish off. (45 clusters and ch 2 sps.)

Round 7: Join next color in any ch 2 sp, [ch 1, 2 sc in same sp], work [sc in next cluster, 2 sc in next ch 2 sp] around, join with sl st in Beg Cl, finish off.  (135 sc.)

Tie Round:  Join next color with sc in any sc, sc in each of next 32 sc,  work Ties (see pattern stitches) in next 2 sc *[sc in each of next 31 sc, work Ties in next 2 sts] repeat from * 3 times, sc in next sc, finish off.

Weave all yarn ends.

Leave a comment

Filed under Patterns