Category Archives: Patterns

Very Hungry Caterpillar Cocoon and Beanie PATTERN

SONY DSCThe pattern is now available for sale on Ravelry Here!

Crochet this adorable cocoon and beanie for your newborn’s photo shoot or Halloween costume!

Eric Carle’s Very Hungry Caterpillar is brought to life in this delightful pattern featuring the subtle color variations of the beloved children’s book through the use of variegated yarn. The impression of Caterpillar’s body segments is achieved by alternating rows of both loops and back loop only stitches.

Baby can scrunch up inside the cocoon for those adorable newborn pictures. This is only available in newborn size and will fit babies up to 10 lbs.

Pattern includes pictures, gauge, crochet and assembly instructions. Enjoy!

I would love to see pictures of your finished project! Email them to me at the address on the pattern.

Leave a comment

Filed under Baby, Designs, For Sale On Ravelry, Patterns

Cotton Rounds

Cotton Rounds 2It’s not very often that I make something for myself.  But I took a break over the last couple of days and did just that.  I saw a pin on Pinterest for a pattern in a UK crochet magazine that was an idea I could really use. cotton roundsI like to use cotton rounds to clean my face with astringent.

Even at 35 (Oops. There it is.)  it’s still the only way I feel like I’ve gotten the dirt and oil off my skin.  I fell in love with cotton rounds instead of cotton balls when I found them.  But I’m constantly buying new and throwing them away.  These rounds are also made of cotton, but are reusable.  I tried them out already and they work great.  The pin I saw on these looked like it was just one round but that seemed too small to me, so I did a second round of single crochet.  But after using them I think the single round (I did treble crochets) would work fine.

Finished Size:

1.5 – 2 inches wide

Required materials:
  • Cotton yarn
  • Size F Crochet Hook

Cotton Round:

Round 1: In a magic ring, ch 3, treble crochet 19, join with sl st in beg ch 3. Tighten the magic ring until the center hole is about the size of a pencil.

Optional Round 2: Ch 1, 2 sc in same st and in each around, join with sl st in first sc. Finish off.

Rope

Chain 35, sl st in 5th ch from hook and in each across to beg chain, 9 sc in beg ch. Finish off.

Weave all yarn ends.  Wash prior to use according to yarn label.  Thread the rounds onto the rope and hang near your bathroom sink.

Leave a comment

Filed under Patterns

April – Square Eight

April – Square Eight

April’s second square is blessedly more simple than the daffodil debacle.  Yellow isn’t normally my color.  Maybe I’m just not the bright and cheery personality that it implies, but it’s normally not the first color I would select.  But I figured an April square for spring time would be yellow.  And I was surprised to find myself refreshed by this little gem.  The square is a little more than basic with an offset diamond in the center which requires a bit of shaping, and two chain-2 spaces at the center of each side to mix things up a little bit.

The original inspiration for the square can be found here but I’ve modified it and written my own pattern again.  My pattern can be found on Ravelry, here.  Additionally, I have added an optional replacement to round 5  to close the chain-2 spaces on each side and make solid rows instead.  I think I like the open spaces however.

I have also added this to my Ravelry store as a downloadable PDF.  Download here!

Required Materials:

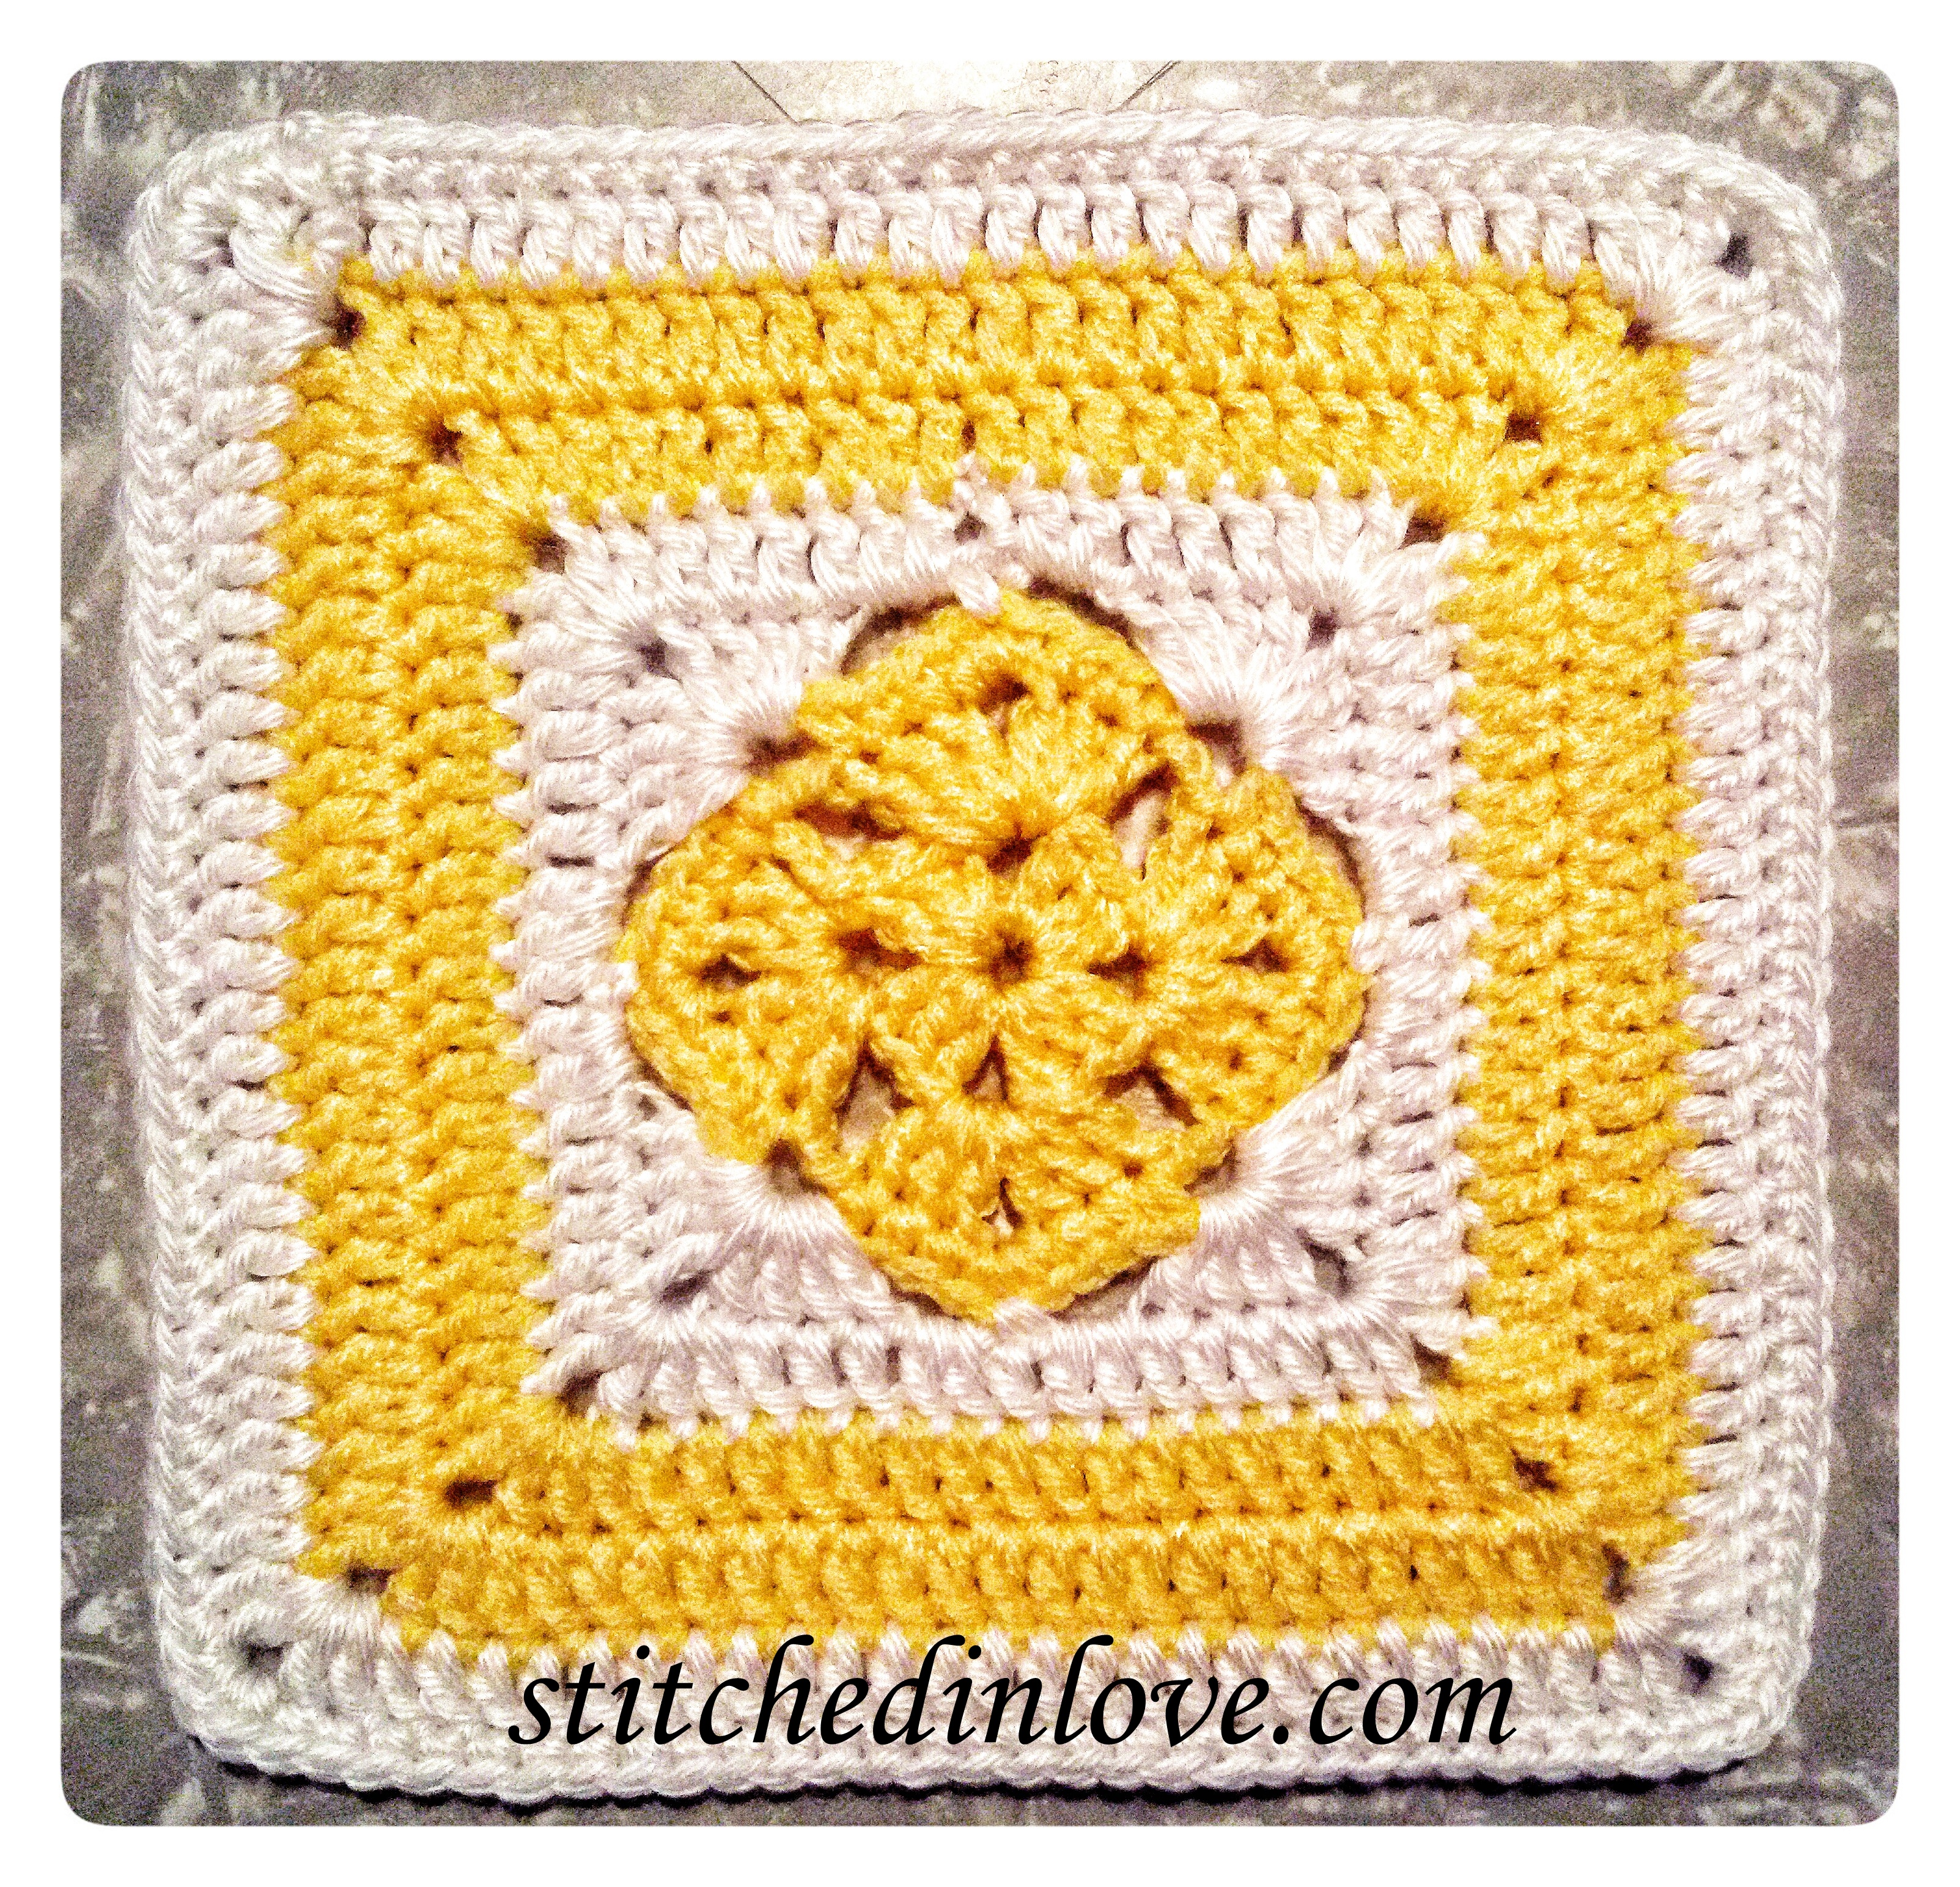
  • Yarn Color A – Yellow for diamond
  • Yarn Color B – White

Square:

Round 1: With Color A, sl st in a magic ring, ch 3, 2 dc in ring, ch 2, (3 dc, ch 2 in ring) 3 times, join with sl st in top ch of beg ch 3, pull tail of magic ring tight to close ring to complete round.

Round 2: Sl st across to corner ch 2 sp, (ch 3 (counts as beg dc), (2 dc, ch 2, 3 dc in same space) ch 2 [3 dc, ch 2, 3 dc in next ch 2 sp, ch 2] 3 times, join with sl st in top of beg ch 3.

Round 3: Ch 1, sc in same st, and next 2 dc, [3 sc in corner ch-3 sp, sc in each of next 3 dc, ch 2, skip next ch-2 sp, sc in each of next 3 dc] 3 times, 3 sc in corner ch-2 sp, sc in each of next 3 dc, ch 2, join with sl st in beg sc. Finish off.

Round 4: Join Color B with sc in the second sc of any corner, ch 2,  (4 dc, ch 2, 4 dc) in next ch-2 sp, ch 2  (this will be the new corner);  [sc in the second sc of the next corner, ch 2, (4 dc, ch 2, 4 dc) in the next ch-2 sp, ch 2] 3 times, join with sl st in beg sc.

Round 5: Ch 4 (beg dc plus ch-2), skip next ch-2 sp, dc in next dc and in each across to corner ch-2 sp, [ (2dc, ch 2, 2 d) in corner, dc in each dc across to next ch-2 sp, ch 2, skip ch-2 sp, dc in next st, ch 2, skip next ch-2 sp, dc in next dc and in each across to corner ch-2 sp] repeat from [ to ] twice more, (2 dc, ch 2, 2 dc) in corner, dc in each dc across to next ch-2 sp, ch 2, join with sl st to beg dc.  Finish off.

Optional Round 5: Ch 2, 2 dc in next ch2 space and in each dc across to corner ch-2 sp, [ (2dc, ch 2, 2 dc) in corner, dc in each dc across to next ch-2 sp, 2 dc in ch-2 sp, dc in next st, 2 dc in next ch-2 sp, dc in next dc and in each across to corner ch-2 sp] repeat from [ to ] twice more, (2 dc, ch 2, 2 dc) in corner, dc in each dc across to next ch-2 sp, 2 dc in ch-2 sp,  join with sl st to beg dc.  Finish off.  Continue each round going forward by double crocheting straight across each row instead of completing the chain 2 spaces.

Round 6: Join color A with sl st in any corner ch-2 sp, ch 2 (counts as beg dc now and throughout) (dc, ch 2, 2 dc in same sp) [dc in each dc across to next ch-2 sp, ch 2, skip ch-2 sp, dc in next st, ch 2, skip next ch-2 sp, dc in next dc and in each across to corner ch-2 sp, (2 dc, ch 2, 2 dc) in corner] repeat from [ to ] twice more, dc in each dc across to next ch-2 sp, ch 2, skip ch-2 sp, dc in next st, ch 2, skip next ch-2 sp, dc in next dc and in each across to beg dc, join with sl st to beg dc

Round 7: ch 2, dc in next dc, [ (2 dc, ch 2, 2 dc) in corner, dc in each dc across to next ch-2 sp, ch 2, skip ch-2 sp, dc in next st, ch 2, skip next ch-2 sp, dc in next dc and in each across to corner ch-2 sp] 3 times (2 dc, ch 2, 2 dc) in corner, dc in each dc across to next ch-2 sp, ch 2, skip ch-2 sp, dc in next st, ch 2, skip next ch-2 sp, dc in next dc and in each across to beg dc, join with sl st to beg dc. Finish off.

Repeat rounds 6 and 7 changing colors until desired size is reached.  Weave all yarn ends and block your work.

*Note: I only repeated round 6 once in white and then completed an edging round of single crochet to remain within the 7 inches for the squares that I am completing for the Granny Square Project.

2 Comments

Filed under 30 Days of Blog - 2014, For Sale On Ravelry, Patterns, The Granny Square Project

February – Square Three

February - Square Three

February – Square Three

February’s first square is another very basic Granny.  As a matter of fact, the first three rounds are worked exactly the same as the basic Granny I did for January’s first square.  However, starting with round four, instead of working clusters (3 dcs) in chains spaces, double crochets are worked in the previous row’s double crochets – with the exception of the corners of course.  I completed this square in a single variegated yarn instead of finishing off and changing colors after each round.  I prefer January’s basic Granny over this one.

Round 1: Sl st in a magic ring, ch 3, 2 dc in ring, ch 2, (3 dc, ch 2 in ring) 3 times, join with sl st in top ch of beg ch 3, pull tail of magic ring tight to close ring to complete round.

Round 2: Sl st across to corner ch 2 sp, ch 3, 2 dc in same sp, ch 1, (3 dc, ch 2, 3 dc in next ch 2 sp, ch 1) 3 times, join with sl st in top of beg ch 3.

Round 3: Sl st across to corner ch 2 sp, ch 3 2 dc in same sp, ch 2, 3 dc in same sp, ch 1, (3 dc in next ch 1 sp, ch 1) across to corner, *(3 dc, ch 2, 3 dc) in corner ch 2 sp, ch 1, (3 dc in next ch 1 sp, ch 1) across to corner, repeat from * around and join with sl st in top of beg ch 3.

Round 4: Sl st across to corner ch 2 sp, ch 3 2 dc in same sp, ch 2, 3 dc in same sp, ch 1, 2 dc in next ch 1 sp, dc in next dc and in each across to next ch 1 sp, 2 dc in next ch 1 sp, ch 1, *(3 dc, ch 2, 3 dc) in corner ch 2 sp, ch 1, 2 dc in next ch 1 sp, dc in next dc and in each across to next ch 1 sp, 2 dc in next ch 1 sp, ch 1, repeat from * around, join with sl st in top of beg ch 3.

Repeat round 4 until desired size has been reached. Finish off.

Leave a comment

Filed under Patterns, The Granny Square Project

January – Square One

So I am a little behind in starting out the Granny Square Project.  The new baby decided to come a few weeks early in December rather than wait till the middle of January so I’ve been a bit busy.  But, we went to visit the in-laws this past weekend and I was able to get caught up while they played with the kids.  So I will be posting both January and February’s squares here shortly. 

January - Square One

January – Square One

January’s first Granny Square is the most basic of Grannies.  I completed it in blue and white to go with all the cold temperatures and snow we’ve been having this winter.  Each of the squares in the project will be seven inches square.

The basic pattern is as follows.  As a note for all my Grannies, I start them all out using the “magic ring.”  There is a good tutorial here if you need it.

Round 1: Sl st in a magic ring, ch 3, 2 dc in ring, ch 2, (3 dc, ch 2 in ring) 3 times, join with sl st in top ch of beg ch 3, pull tail of magic ring tight to close ring to complete round. Finish off.

Round 2: Join new color with sl st in any ch 2 sp, ch 3, 2 dc in same sp, ch 1, (3 dc, ch 2, 3 dc in next ch 2 sp, ch 1) 3 times, join with sl st in top of beg ch 3. Finish off.

Round 3: Join new color with sl st in any corner ch 2 sp, ch 3, 2 dc in same sp, ch 2, 3 dc in same sp, ch 1, (3 dc in next ch 1 sp, ch 1) across to corner, *(3 dc, ch 2, 3 dc) in corner ch 2 sp, ch 1, (3 dc in next ch 1 sp, ch 1) across to corner, repeat from * around and join with sl st in top of beg ch 3. Finish off.

Repeat round 3 until the desired size is reached. I also added a row of single crochet for edging with 3 sc being completed in each corner.  This is completely optional.

The nice thing about this is you can finish off on each round and add a new color, or you can continue in the same color.  Each square can look completely different, yet be completed from the same pattern.  You can also make it as large or as small as small as you like.  Usually the fewest rows completed is 3.  (See, I’m trying to appreciate the Granny here.)  January’s square two coming up shortly!

1 Comment

Filed under Patterns, The Granny Square Project

Ribbon Cross Christening Afghan (Style A)

Afghan 3The pattern for this afghan is now available for sale on Ravelry!  I’ve set the price for it at $5.00.  I would love to hear from anyone who purchases the pattern and see pictures of your completed afghan!  I may even post your picture on the site here!  Click on the picture to see the Ravelry listing, or just the “buy now” link.  Enjoy!


Leave a comment

Filed under For Sale On Ravelry, Patterns

Pattern – Ribbon and Pearls Christening Afghan

The pattern for this afghan is now available for sale on Ravelry!  I’ve set the price for it at $5.00.  I would love to hear from anyone who purchases the pattern and see pictures of your completed afghan!  I may even post your picture on the site here!  Click on the picture to see the Ravelry listing, or just the “buy now” link.  Enjoy!

5 Comments

Filed under Patterns

Baby Booties Pattern

So like I mentioned in the previous post,  I designed these cute little booties.  I looked at several different patterns and just didn’t like them.  So I came up with my own pattern instead using a combination of what I’d seen elsewhere, along with my own changes.  I may even design some more different booties coming up here.

Size: Newborn

Materials:
• Worsted Weight Yarn.
• 3/8” Wide Ribbon
• Size F (3.75mm) Crochet hook
• Yarn Needle

Pattern Stitch:
3 Single Crochet Decrease (3scDec) Uses next 3 sc: insert hook in next st, [draw up a lp] 3 times (4 lps on hook), yo and draw through all 4 lps. (3scDec made.)

Row 1: Ch 26, turn, sc in 2nd ch from hook and in each across (25 sc)

Row 2-4: Ch 1, turn, sc in each sc across.

Row 5: Ch 1, turn, sc in 11 sc, 3scDec, sc in last 11 sc.

Row 6: Ch 1, turn, sc in 10 sc, 3scDec, sc in last 10 sc.

Row 7: Ch 1, turn, sc in 9 sc, 3scDec, sc in last 9 sc.

Note: Rows 8 & 9 are worked in the round along the edge of previous work.

Round 8: Ch 3, turn, [skip next st, hdc in next st, ch 1] across to end of row, hdc in last st, ch 1, 8 sc evenly in end of rows, ch 1, 25 sc across beginning ch along bottom of work, ch 1, 8 sc evenly in end of rows, ch 1, join with sl st to beg ch 3.

Round 9: Ch 1, turn, sc in each sc around to first [hdc, ch 1] space, [ch 3, sc in next ch 1 sp] across row, ch 3, join with sl st to first sc.

Row: 10: Ch 3, turn, sc in first ch 3 sp, [ch 3, sc in next ch 3 sp] across , finish off leaving a 20” tail for sewing.

Finishing: Turn bootie inside out and whip stitch along the heel and sole to toe. Weave ribbon through Round 8 and tie in a bow.  Weave all yarn ends.

4 Comments

Filed under Baby, Patterns

Star Motif Pattern

You can use this pattern for so many different things.  You can connect them to make a scarf by single crocheting along the edging, or you can use the join-as-you-go method to create an afghan!  I was looking for a star motif pattern and just could not find anything that I liked, so I did it myself.

Materials:

  • 2  colors worsted weight yarn
  • Size I Crochet hook.

Gauge:  Not critical, but you can increase or decrease the hook size if you want a larger or smaller star.  This one measures about 7 inches from the tip of the left arm to the tip of the right arm.

Round 1: With first color,  ch 5, join with sl st in first ch to form a loop,  ch 1, 25 sc in loop, join with sl st to first sc.

Round 2: Ch 1, sc in same st, hdc in next sc, [dc, ch1, dc] in next sc, hdc in next sc, sc in next sc, * sc in next sc, hdc in next sc, [dc, ch 1, dc] in next sc, hdc in next sc, sc in next sc, repeat from* three times more, join with sl st to first sc, finish off.

Round 3: Join next color with sc in first hdc of any section, hdc in next st, [2dc, ch2, 2 dc] in ch 1 sp, hdc in next st, sc in next st, skip next 2 sc, * sc in next st, hdc in next st [2 dc, ch 2, 2 dc] in ch 1 sp, hdc in next st, sc in next st, skip next 2 sc, repeat from * 3 times more, join with sl st to first sc.

Round 4: Sl st in next st, ch1, sc in same st, hdc in each of next 2 sts, [2 dc, ch 2, 2 dc] in next ch 2 sp, hdc in each of next 2 sts, sc in next st, skip next 2 sts, * sc in next st, hdc in each of  next 2 sts [2 dc, ch 2, 2 dc] in next ch 2 sp, hdc in each of next 2 sts, sc in next sc, skip next 2 sts, repeat from * 3 times more, finish off.

Round 5: Join next color with sc in second st of any section, hdc in each of next 3 sts, [2 dc, ch 2, 2 dc] in next ch 2 sp, hdc in each of next 3 sts,  sc in next st, skip next 2 sts, *sc in next st, hdc in each of next 3 sts, [2 dc, ch 2, 2 dc] in next ch 2 sp, hdc in each of next 3 sts, sc in next st, skip next 2 sts, repeat from * 3 times more, join with sl st to first sc.

Round 6: Sl st in next st, ch 2, dc in each of next 4 sts, [2 dc, ch 2, 2 dc] in next ch 2 sp, dc in each of next 4 sts, hdc in next st, skip next 2 sts, *hdc in next st, dc in next 4 sts, [2 dc, ch 2, 2 dc] in next ch 2 sp, dc in each of next 4 sts, hdc in next st, skip next 2 sts, repeat from * 3 times more, join with sl st to first ch 2, finish off.

Weave all yarn ends.

5 Comments

Filed under Patterns

Granny “Circle” Seat Cover Pattern

I wrote this pattern as a follow-up to this Idea post.  I was right in that both the pattern and the project itself worked up very quickly.  I made this holding 2 strands of yarn so it would be extra cushiony.  I also added four ties so that it could be secured to your 4-leg stool or chair. These are worked as part of the last round – not attached separately, making them even more secure.

Materials:

  • At least 2 colors worsted weight yarn – 2 skeins each
  • Size K Crochet Hook

Gauge: Not critical.

Pattern Notes:

  • This pattern is worked in rounds holding 2 strands of yarn together.
  • This piece must be blocked upon completion in order for your seat covers to lay flat.

Pattern Stitches:

  • Beginning Cluster (Beg Cl) – Ch 2, [Yo, insert hook in st or sp indicated and pull up a lp, yo and draw through 2 lps on hook] twice, yo and draw through all 3  lps on hook.  Beg Cl made.
  • Cluster – [Yo, insert hook in st or sp indicated and pull up a lp, yo and draw through 2 lps on hook] 3 times, yo and draw through all 4 lps on hook. Cluster made.
  • Ties: (Uses the next two stitches.) *Ch 20, sl st in second chain  from hook and in each back to last sc, sc in next sc, repeat from * once more for second tie.

Round 1: Ch 4, join with sl st in first ch to form a ring.  In ring: Work [Beg Cl, ch 2,] work [Cluster, ch 2] 4 times, join with sl st in Beg Cl, finish off. (5 clusters and ch 2 sps.)

Round 2: Join next color with sl st in any ch 2 sp, work [Beg Cl, ch 2] in same sp, work Cluster in same sp, ch 2, work [cluster, ch 2, cluster, ch 2] in next ch 2 sp and in each around, join with sl st in Beg Cl, finish off. (10 clusters and ch 2 sps.)

Round 3: Repeat Round 2. (20 clusters and ch 2 sps.)

Round 4: Join next color with sl st in ch 2 between 2 clusters in same sp, work [Beg Cl, ch 2, cluster, ch 2] in same sp, work cluster ch 2 in next sp, * work [cluster, ch 2, cluster, ch 2] in next ch 2 sp, work cluster, ch 2 in next ch 2 sp, repeat from * around, join with sl st in Beg Cl, finish off. (30 clusters and ch 2 sps.)

Round 5: Join next color in any ch 2 sp, work [Beg Cl, ch 2] in same sp, work cluster, ch 2 in next ch 2 sp and in each sp around, join with sl st in Beg Cl, finish off. (30 clusters and ch 2 sps.)

Round 6: Join next color in any ch 2 sp, work [Beg cl, ch 2] in same sp, *work [cluster, ch 2, cluster, ch 2] in next ch 2 sp, work cluster in next ch 2 sp, repeat from * around, join with sl st in Beg Cl, finish off. (45 clusters and ch 2 sps.)

Round 7: Join next color in any ch 2 sp, [ch 1, 2 sc in same sp], work [sc in next cluster, 2 sc in next ch 2 sp] around, join with sl st in Beg Cl, finish off.  (135 sc.)

Tie Round:  Join next color with sc in any sc, sc in each of next 32 sc,  work Ties (see pattern stitches) in next 2 sc *[sc in each of next 31 sc, work Ties in next 2 sts] repeat from * 3 times, sc in next sc, finish off.

Weave all yarn ends.

Leave a comment

Filed under Patterns